
Watching HDR Movies on an SDR Display Without Washed-Out Colors
HDR video is mastered for displays that reach very high peak brightness, reproduce deep blacks, and cover wide color gamuts. When the same movie is sent to an SDR monitor without proper processing, the image often looks flat, gray, and desaturated. The display receives values it cannot interpret, so highlights clip and colors lose their intended intensity. Fixing this needs more than moving a brightness slider: the player must translate the source color space and compress the luminance range intelligently.
Why HDR Looks Wrong
An HDR grade can contain highlights above 1,000 nits while shadow detail sits near zero. An SDR desktop monitor is usually calibrated around 100 nits at a comfortable setting. If the player passes HDR values directly to an SDR panel, the monitor may ignore metadata, apply the wrong transfer function, or treat a wide-gamut signal as sRGB. Skin tones become pale, skies turn gray, dark scenes lose contrast, and bright areas merge into white. The answer is a controlled conversion, not one global adjustment.
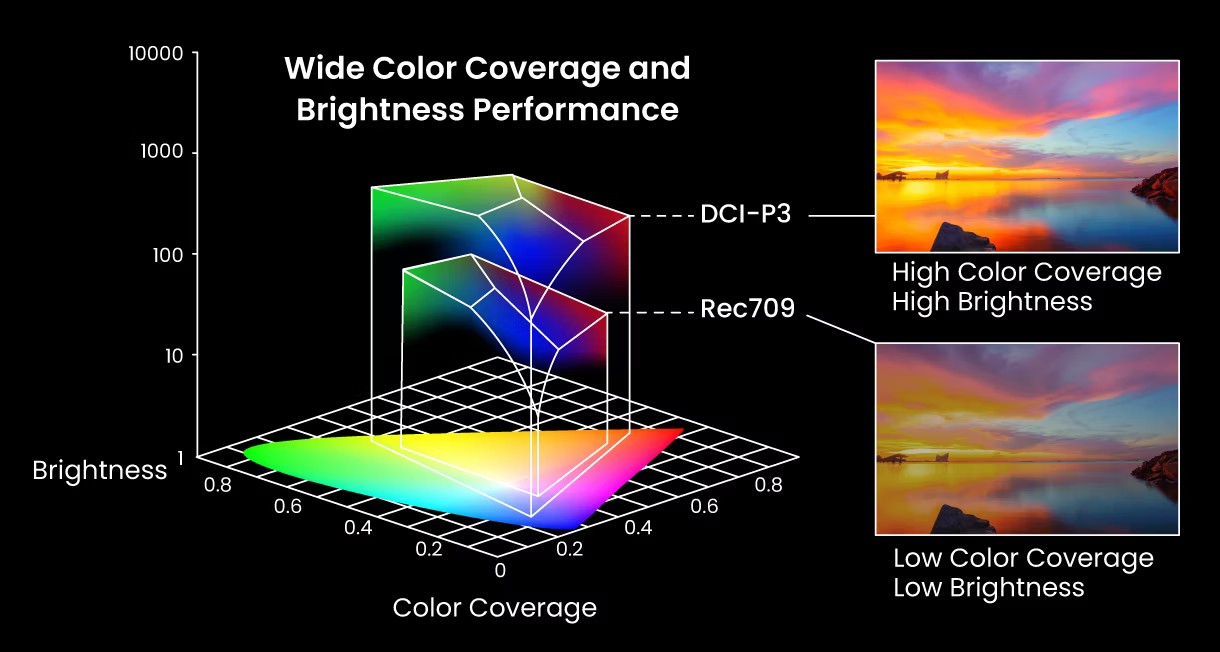
The illustration below shows how wide-gamut HDR content is mapped for a narrower display.
Step One: Convert the Color Space
HDR movies commonly use DCI-P3 or Rec. 2020, while SDR monitors are designed around sRGB or Rec. 709. These gamuts are not interchangeable. A saturated red or green may fall outside what the monitor can reproduce. A good player converts source primaries into display primaries and uses gamut mapping to bring out-of-range colors into the available space. Without this step, colors are clipped abruptly or shifted in hue. The goal is to preserve color relationships, not make every hue as vivid as possible.
Step Two: Tone Map the Brightness
Tone mapping compresses the movie's high dynamic range into the monitor's real peak luminance. The player should examine maximum and average brightness, then map highlights smoothly instead of clipping everything above a fixed threshold. On a typical SDR monitor at about 50 percent brightness, the target may be near 100 nits. A good curve preserves detail in clouds, lamps, and reflections while keeping midtones stable. If the source range is extremely wide, partial mapping from median luminance can keep colors more consistent.
| Content or display | Peak luminance | Color space | Bit depth |
|---|---|---|---|
| HDR movie | Often above 1,000 nits | DCI-P3 or Rec. 2020 | 10-bit |
| SDR monitor | About 100 nits | sRGB or Rec. 709 | 8-bit |
| Converted output | Monitor peak | Mapped to display gamut | 8-bit with dithering |
Bit Depth, Banding, and Dithering
HDR is usually graded in 10-bit color, which provides 1,024 values per channel. An 8-bit SDR display offers only 256 values. When a 10-bit gradient is compressed to 8 bits, smooth transitions in skies, fog, or shadows can develop visible bands. Dithering adds very fine, controlled noise before quantization so the eye perceives a smoother gradient. It does not recover lost detail, but it greatly reduces false contours.
Practical Options on macOS
Infuse is a polished commercial option on macOS. It handles color conversion and tone mapping automatically, which suits users who want the best out-of-the-box experience and are willing to pay a subscription. It is convenient for a living-room Mac or a secondary display.
For a free and open-source approach, mpv is excellent. On a Mac connected to an SDR monitor, add these settings to the mpv configuration file:
# ==========================================
# Video Output & Hardware Acceleration
# ==========================================
profile=high-quality
vo=gpu-next
hwdec=auto-safe
# Essential on macOS so mpv reads your monitor's ColorSync ICC profile
icc-profile-auto=yes
# Prevents macOS from mistakenly treating the SDR output window as EDR/HDR
target-colorspace-hint=no

# ==========================================
# State-of-the-Art Tone Mapping (HDR -> SDR)
# ==========================================
tone-mapping=bt.2390
tone-mapping-mode=luma
gamut-mapping-mode=perceptual
hdr-compute-peak=yes
# Match your SDR monitor's real peak (100 to 120 is standard for SDR; 200+ makes dim HDR movies too dark)
target-peak=100

# ==========================================
# Upscaling (Uses your RX 6800 nicely)
# ==========================================
scale=ewa_lanczossharp
dscale=mitchell
cscale=ewa_lanczossharp

# ==========================================
# Dithering & Debanding (Smooths color gradients)
# ==========================================
dither-depth=auto

# ==========================================
# UI and macOS Specifics
# ==========================================
keep-open=yes           # Keeps the player open after the video finishes
osd-bar=no              # Disables the default blocky OSD for a cleaner look
autofit=100%            # Ensures the video doesn't open larger than your screen
# no-hidpi-window-scale # Uncomment this ONLY if you are using a 4K display and want perfect 1:1 pixel mapping
This configuration uses the gpu-next renderer and libplacebo, converts video to the display color space, enables tone mapping, and applies dithering. Adjust the target peak to the measured brightness of your monitor; 100 nits is a reasonable starting point. Change that value before altering contrast or saturation.
Practical Options on Windows
On Windows, Media Player Classic Home Cinema with madVR remains a powerful classic setup. madVR offers high-quality chroma scaling, custom tone-mapping curves, 3DLUT calibration, and detailed dithering control. It requires more configuration than a simple player, but it can match HDR content to an SDR display with excellent precision.
A Quick Quality Checklist
Start with a correct display profile and a neutral picture mode. Set a comfortable brightness, then measure or estimate peak white. Choose a player with color management and tone mapping, enable dithering, and compare known scenes: bright clouds, faces in shadow, and saturated objects. Avoid excessive saturation compensation, because it can look unnatural.
Conclusion
Watching HDR on an SDR display is a compromise, but it does not have to look washed out. Convert the color space, tone map to the monitor's real peak, dither the final 8-bit output, and keep midtones consistent. Infuse offers a convenient paid path on macOS, while mpv and madVR provide free, highly configurable alternatives.
Let's work together
Do you need more info, help with your project, or to develop an idea?
Whether it's an easy question, a quick doubt, or just a 5-minute chat, send me a message—it costs nothing and I'm always ready to help. I love discussing a problem to understand it, getting creative with solutions, and focusing on simple, reliable, and straightforward ideas that we can actuate quickly.
Contact me →